By Misty M Beller @MistyMBeller
We've discussed before how Facebook Ads have become one of my "go-to" marketing tools. I get a lot of furrowed brows when I say that, so today let's take a moment to walk through the ad set-up - especially the crucial pieces to make sure the ad:
- is seen by your target market and
- gives you the highest possible ROI (return on your investment).
First, let me outline a few of the particular advantages of Facebook advertising:
- You can advertise any book at any time, whether it's on sale or not, regardless of how many reviews it does or doesn't have. I use Facebook ads regularly for books on pre-order and books that need a little extra "umph" to gain visibility and sales traction during a slow period. Especially if said books are in KDP Select and not currently eligible for a Kindle Countdown Deal or free days.
- Easy to make changes at any time. You can set the ad schedule to run a low budget over several days or weeks. This allows you check your statistics and make changes if you feel your cost per click is too high.
- Analytics! You'll see what I mean soon.
So without further ado, let's walk through the steps for the ad set-up.
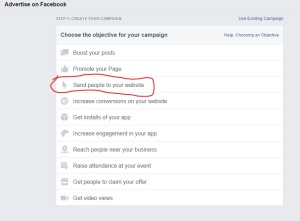
- Step one asks your objective for the ad. You always want to click "Send people to your website." The website you enter should be your Amazon Book Page (or whichever bookseller you want people to purchase from). You want people to have as few clicks as possible in order to purchase your book.
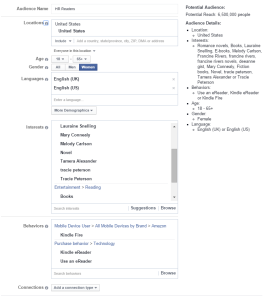
- Step two is choosing your audience, one of most important steps! Take your time with this one. I always try to make sure my potential reach is over 1 million.
- First, enter your reader demographic info (age, gender, language).
- Then, enter interests that are popular on Facebook for your potential reader. This is a great place to list other big-name authors within your genre. Also, make sure you enter activities like reading, fiction, and ebooks. If you start typing any word, the suggestion box will tell you the available options associated with that word. It makes it fairly easy!
- Last, I use the "Behaviors" section to list things tools my readers would use, like Kindle eReader, etc. Again, if you start typing a word or term, the suggestion box will help you finish it.
Here's an example of the Audience Profile for my historical romance books:
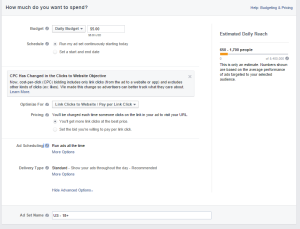
- Step three is setting your pricing. There are some REALLY important buttons in here, so listen closely!
- The default setting is a $5 per day spend. That's average. If I'm going for a low budget to just nudge the book up in the rankings, I usually do $3 or $5 per day. If I'm going for a bigger push, I set the budget at $10 per day. I've heard of people setting a high budget of several hundred dollars for a single day, and receiving fantastic results, but I haven't personally tried that strategy.
- Next set your schedule. I often do 2 week long ad campaigns.
- Now we come to the important box! Under "Optimize for," it will default to Pay per Impressions. CHANGE THIS! You want to use "Link Clicks to Website / Pay per Link Click." This means you'll only pay when someone clicks through to the website you've listed (your Amazon Book Page).
- I typically leave the remaining fields as their default (Ad Scheduling and Delivery Type).
- Step four is your image. I like to use a single image in each ad, but I upload several image options so different ad impressions will show a different image. You'll see in analytics later which images are performing well (causing a lot of people to click through to your Amazon page). You can cull any images that aren't earning their keep at that point.
- The images you use should not be memes. Think of them more as billboards - mostly pictures, very little print. In fact, Facebook will not allow the ad image to contain more than 20% text. They have a handy grid tool to help you know if your image will be approved.
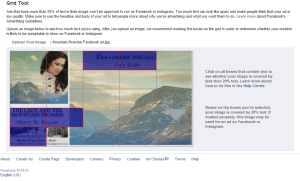
- I typically use either Canva.com or Powerpoint to create my images.
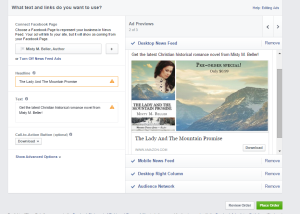
- Here's a sample ad image I'm using for this particular ad:

- The images you use should not be memes. Think of them more as billboards - mostly pictures, very little print. In fact, Facebook will not allow the ad image to contain more than 20% text. They have a handy grid tool to help you know if your image will be approved.
- Step five: Last but not least, create your ad copy.
- Connect the ad to either your Facebook author page or your personal profile.
- Headline: I usually use the book title.
- Text: A short teaser like "Get the latest Christian historical romance from Misty M. Beller" or "A riveting tale of DANGER and DEVOTION during the greatest battle of the Civil War..."
- Call to Action Button: This is the button they'll click to take them to the website you've linked. I use "Download" because I want them to be thinking about purchasing as they click.
- Last, select which Facebook formats you want to include your ad. I typically use all of them (you're not actually charged unless someone clicks your ad). I've heard of authors who don't use the "Desktop Right Column" option, because they feel it's not typically useful. The preference is yours.
- Step six: Click "Place Order."
And now you've done it! Sit back and watch the sales roll in.
Analytics
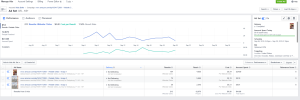
Within hours of your ad start day, you can begin to see analytics for your ad under "Manage Ads." These analytics will tell you:
- Total number of website clicks for the entire campaign, and for each day.
- Total number of people who saw the ad.
- Each day's average cost per click, and total spent each day.
- You can also see a breakdown by image, showing number of clicks for each image and the average cost per click. It assigns a helpful ranking number for each image.
- There's lots of other great info there as you dive in!
Now, I'd love for you to share your thoughts! Have you tried Facebook advertising before?
Misty M. Beller writes Christian historical romance, and is author of the bestselling novels The Lady and the Mountain Man and The Lady and the Mountain Doctor.
Misty was raised on a farm in South Carolina, so her Southern roots run deep. About eleven years ago, she made a career change from farm life into the business world, where she worked as a Senior Manager and Director of Process & Training. She's now loving the life of a full-time writer, wife, and mother.

Excellent Article.. Kindly visit us @ apple Service center in Chennai
ReplyDelete